My visitors

Wednesday, 29 April 2015

Crochet ball

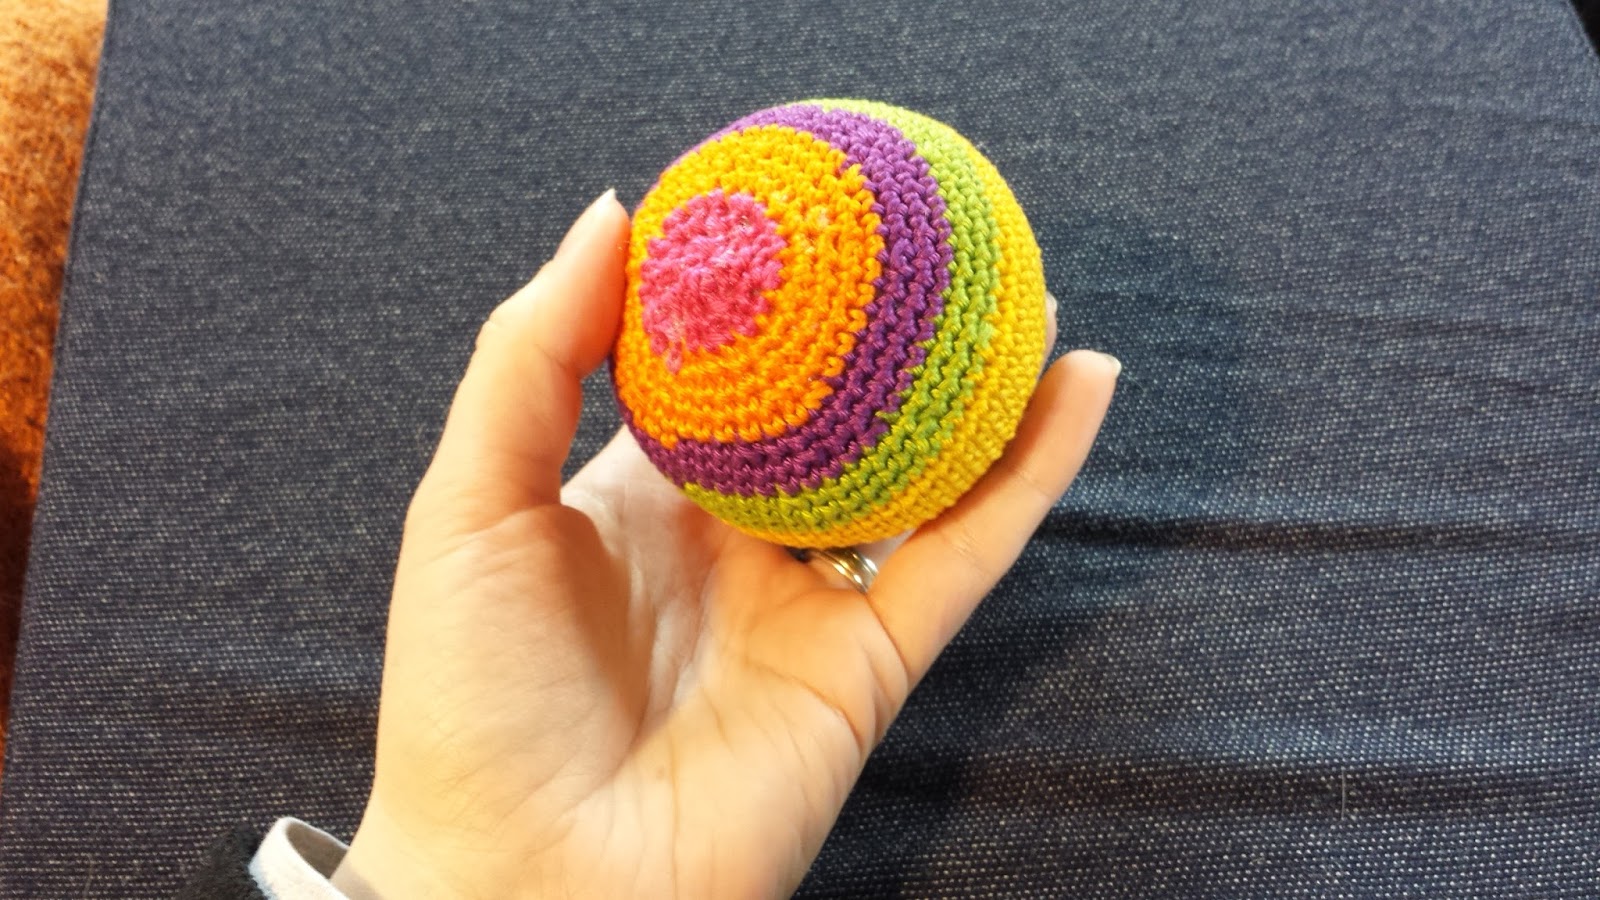
 On Easter weekend we had a lot of snow, so we were inside quite a lot. I seized the occasion to crochet a little more. My parents-in-law were about to go on a small trip and wanted to take small presents for their friends' children. I offered to make a small rattle-ball for the youngest child - 1,5yo. Inside is hidden a Kinder surprise box with dry beans inside. I've glued it with instant glue for additional safety.
 I have made round projects before, but I was never really satisfied with their roundness, so I search for a "perfect ball" pattern on Pinterest. I found one on Ms Premise-Conclusion and decided to try it out. It was not easy to follow as there was no apparent logic, at least in my opinion. But the result was brilliant!
I'll definitely be making more balls from that pattern!

Monday, 27 April 2015

The SC & more n°271: Square

About one and a half week ago I stumbled upon a rather interesting blog. It's author, Isabelle Kessedjian is organising a weekly crochet challenge. There is a theme, and you have the week to invent and create something corresponding to that theme. You are not supposed to follow a pre-existing pattern but other than that you are pretty free to do whatever you like!

This is my very first participation and I am quite excited about it. The theme of the week is: "square".

It took me a little while to think about it, then I decided to make dish-/wash-cloths.

Crochet size: 4mm
Yarn: Cotton in yellow and peach
Size: about 20x20cm
Stitches used (UK): Chain, Slip Stitch, Double Crochet, Treble Crochet

1st Colour:
I first chained about 35 stitches + 3 for my 1st treble.
Then 3 rows of Tr, 4 rows of Dc, 6 rows of Tr, 4 rows of Dc, 6 rows of Tr, 4 rows of Dc and 3 rows of Tr.
Afterwards I Dc-ed all around as basis for my edge.

2nd Colour:

Dc all around.
Then Shell edging (instructions there). I won't repeat the instructions, they are quite clear on that blog. I will also try to practice the other types of edging in the near future :)

The result:
For the "museum" :)
This time it is really square, sorry Isabelle for the delay!
I still need to steam-block them, they are also a little clumsy. I did not pay enough attention (was watching "Frozen" with my little ones!) and made some counting mistakes. It does not really matter though, I am looking forward to using them.

Have a look at the other participations now and wait for my next posts, I am preparing several right now!

Thursday, 23 April 2015

Un Mot, des titres : session 31

Cela devient une très mauvaise habitude... me voici encore une fois en retard! Cette fois-ci j'ai même commencé le livre le 14 au soir :( Toutes mes excuses Calypso!

Une autre habitude, fâcheuse aussi: choisir des livres qui sont en réalité des Tomes 2 ou 3!

Pour le mot "Peur" j'ai choisi le livre :

Jean-sans-Peur, de Michel Zévaco


Ce livre est précédé de "L'Hôtel Saint Pol", ils ont tous les deux été publiés en 1911. Jean sans Peur est Jean 1er de Bourgogne, il aspire au trône de France qui est occupé par le roi Charles VI (dont la santé mentale est plus que vacillante). Nous sommes au XVème siècle, en 1407. Deux partis se disputent: les Armagnacs et les Bourguignons.

Malgré le titre, l'histoire ne tourne par particulièrement autour du personnage de Jean de Bourgogne. Au contraire, le personnage principale est un certain Chevalier Hardy de Passevant. Nous rencontrons un sorcier qui expériemente avec la mémoire, la vie et la mort, à la recherche de l'acte suprême et de la vie éternelle. Notre Chevalier de Passevant se retrouve comme un pion, utilisé par la reine, utilisé par Jean sans Peur, utilisé par le sorcier, mais à chaque fois il s'en sort et semble avoir une chance inouïe. Il devrait être mort plusieurs fois mais en a réchappé au moins trois à quatre fois. Il est d'un grand courage et son but est de retrouvé sa bien-aimée qu'il croyait morte mais qui est en fait, elle aussi, manipulée par les grands pouvoirs de l'histoire

Très honnêtement je ne sais pas si j'ai réellement apprécié le livre, probablement pas suffisament car je n'ai pas particulièrement envie de lire la première partie. Par contre il était suffisament intéressant pour éveiller ma curiosité par rapport aux faits historiques.


Voilà tout ce que j'ai envie de dire par rapport à Jean sans Peur. C'est peu, je sais, mais je manque d'inspiration pour en dire plus. Le mois prochain sera peut-être meilleur. Je l'espère!

Friday, 10 April 2015

T-shirt garn rug

I've been keeping old t-shirts for a while now, even before getting on Pinterest. Then I found pins on how to cut them to make yarn. So now I'm cutting my t-shirts and making a lot of yarn. One t-shirt gives about 10 meters of yarn. There are also many tutorials for rugs but I decided to give a try to making up my own pattern.

I'm presenting it to you now. It is my first one and I know already that there are mistakes, I'll point them out later with the pictures.

T-shirt yarn rug

Using about 5 to 6 t-shirts with a 10 mm hook
I am using UK terminology / dc = double crochet ; ch = chain ; sl.st = slip stich ; htr = half trebble ; tr = trebble ; ch.sp. = chain space
*..* repeat all around
1-  6dc in a magic ring
2- 2dc in each stitch
3- 2dc in each stitch
4- Ch2 *1dc - ch2* join with sl.st
5- Ch2 *3htr in each ch.sp. - ch1* sl.st in the 1st ch
6- Sl.st in the next ch.sp
7- *4dc in ch.sp - ch1*
 Note = you can stop here to make a table mat

8- Ch3 *Tr in each st*
9- Ch3 *2tr - ch1 - skip 1 st*
10- *ch5 - skip 2 st and sl.st in the 3rd st*
11- In each ch.sp around *dc - htr - tr - htr - dc*

Done!
 So now, let's start with some self-criticism :)

The rug does curl a bit, which I think means that there are too many stitches on one row and you can also see exactly where I started every new row. It's very obviously crooked!!
So I suppose you can give a try to the pattern but there are definitely some adjustments to be made.

On the whole I am quite pleased with the rug's general look. What do you think?

Wednesday, 8 April 2015

Adjusting trousers' waist in less than 10min

Online one can find many tutorials on how to adjust the waist of one's trousers. I am glad to read that I am not the only woman on Earth having a "gap" problem!

Last time I bought trousers (about two years ago I think) I tried one technique which consisted of sewing an elastic band to the waist band of the trousers. It worked well enough for me to wear them (with additional belt) during those two years. But I wasn't entirely satisfied, it didn't look nice and had been a hassle to sew.

Yesterday I went shopping again because my previous trousers were too worn (I am planning on upcycling them into short trousers for summer though!). The "gap" still being there, I looked for other ideas on how to get rid of it. There is another technique where one makes two holes to slip through an elastic band and this band is sewn with the machine on both sides to the trousers waist. It seems like a good idea, but I do not like that you cannot adjust it at will. Since I've had my two children I have the tendency to gain and lose weight every few months *annoyed sigh*.

So I've decided to go for the second technique without the sewing-machine part! 

What you need:
A pair of scissors, needle and thread, two buttons, a safety-pin and elastic-band with button-holes
 How to:
Cut a hole inside the trousers waistband
Sew your two buttons a little further away from the hole
Button one end of the elastic, attach the safety pin to the other end, and push it through the hole
Tadaaaa! You're good to go after an under 10minutes job!
Now you have plenty of time left to grab a cup of tea and do something else while knowing that your trousers are adjusted and adjustable :)

I have a few more tutorials to come, I am so happy with crocheting that I have started making up patterns!

Monday, 6 April 2015

Sleepyheads

Good morning!

I am sorry to be so quiet these days, I have a lot to do. I have been planning the opening of an online shop, taking care of alternating sick children and been "out of order twice" myself. Now things seem to be getting back on track and I hope to be able to share the link to my shop very very soon!
You can already check my Facebook page already, just look for "The Giraffe & the Elephant" !

 In the meantime let me show you what I have been busy crocheting this weekend!

 My father-in-law makes wooden jewel, last year I asked him to make a series of little crosses to use in different ways. For Easter I crocheted a long chain (200 chain stitches) to make pendants for my two adorable children. They found them in the garden during the eggs hunt. They loved them!

Now, I don't know if you will remember but I had found on Pinterest a pattern that decided me to learn crochet. It took me a little while to practice my new skills, but finally yesterday I finished them! I present to you our new baby dolls. My son, T. , hasn't named his, but my daughter, N.,  did name hers after me: "Fred" :)

Don't they look adorable? I love amigurumi!
I'll write again soon, I have a lot to show you :)


P.S: sorry for the page settings and text font+colours, I am writing from my phone and struggling to get what I really want. I will correct all this once at home. DONE! ^^
 

Sunday, 5 April 2015

Happy Easter!

I would like to wish you all a very happy Easter! I hope you are enjoying this weekend. In our part of Germany, the weather is whimsical but we are still having a lovely family time :)

Sharing a few pictures of the weather on thursday and of my mother-in-law's Eater "trees". They are very traditional in Germany. I did not have time to make one this year and therefore did not get the chance to win some delicious chocolate on Le Petit Pari.
Next year maybe!