My visitors

Showing posts with label Clothing. Show all posts

Thursday, 23 June 2016

The SC & more n°331: Faites de la Musique

 I sing in the German-French Choir of my town. I really enjoy it and we've just had our summer concerts. We usually wear black trousers or skirts, but just two weeks before the concerts, my black trousers abandonned me (read: big holes that I could not repair). I did not want to go shopping, I never find anything I really like and that really suits me. So I took out my old Burda magazines and chose a pattern.


Picture for the Museum, visit the page for more creations
 And now I have a skirt that I LOVE! It's shape is quite flattering, it does even "hide" my belly ;)
Now, the SC & more challenge for this week has the "Fête de la Musique" for theme, or rather "Faites de la Musique" - make music. I am not out of topic since the skirt was sewn for my choir singing. My favourite part of the skirt: the pockets! I love the cherries ^^.

Friday, 13 May 2016

Full-circle skirt

 Hi everybody! I am slowly trying to get back to blogging. Somehow I fell out of my rythm, I just need a little bit of time to get back on track.

I also decided to try making more clothes for myself. I cannot really find what I like in the shapes and colours that I like. I also haven't got my pre-children shape yet (don't know if I'll ever get back to it though), which makes clothing myself pretty difficult.

Recently got a pile of old fabrics from my mother-in-law, I already used one of them and made a full-circle skirt. The fabric used to be an old curtain, but I like it better as a skirt. The fabric feels both light and heavy, it has a nice drape.
It does twirl so very nicely!

This skirt is one of my little girl's dream come true! The twirling, the colours, everything! The only thing missing is a petticoat underneath the skirt. I need volume, when I stand the fabric falls along my legs at the back. That part does not look too good. But hopefully I'll soon be able to correct this.

How do you like this skirt?

Monday, 7 September 2015

Up-cycling old jeans

I've got some clothes to repair, transform, up-cycle etc. A big pile actually... and I only seem to be able to deal with one every now and then. I had such a big plan with it! Three pieces per week, but after two weeks I realised I could not manage - I have too many things going on.

But anyway, here the one thing I did the other day: a belt-bag made from an old pair of jeans, some fabric remains and two snap buttons.

I am looking forward to using it. It is probably be quite practical when doing small trips that do not require a handbag.

Saturday, 18 July 2015

The SC & More n°283: Nightwear

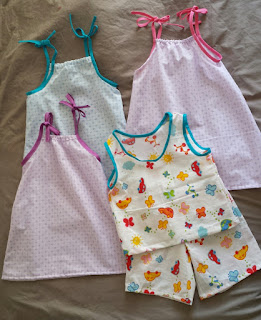
This week Mummy Factory is hosting the challenge! She told us to do whatever we like. Two days ago I went to the fabric shop... bad idea ;) as per usual I bought several pieces. Among them two very sweet, soft and light 100% cotton fabrics. One in blue, one in light purple. They reminded me immediately of old nightwear I had as a child and I visualised my daughter and my two nieces in nightgowns made of those fabrics. So I had to buy them.

I made three gowns, size 5yo, size 4yo and size 3yo.
One in blue with blue biais tape.
One in light purple with pink biais tape and one in purple with purple biais tape.

I didn't want to use the same fabric (with mini bows) for my son, so I used my favourite Ikea fabric with the same biais tape as the first night gown, and I made summer pjs!
I am very much looking forward to seeing the four cousins together!!

For the Museum, a square picture
These nightwears are really light and look comfortable. They are ideal for hot summer nights such as the ones we have currently!

In about two weeks we will be all together, won't that be nice? A quatuor with a 5yyo, a 4yo, a 3yo and a 2,5yo!! Days will be lively :)

Wednesday, 8 April 2015

Adjusting trousers' waist in less than 10min

Online one can find many tutorials on how to adjust the waist of one's trousers. I am glad to read that I am not the only woman on Earth having a "gap" problem!

Last time I bought trousers (about two years ago I think) I tried one technique which consisted of sewing an elastic band to the waist band of the trousers. It worked well enough for me to wear them (with additional belt) during those two years. But I wasn't entirely satisfied, it didn't look nice and had been a hassle to sew.

Yesterday I went shopping again because my previous trousers were too worn (I am planning on upcycling them into short trousers for summer though!). The "gap" still being there, I looked for other ideas on how to get rid of it. There is another technique where one makes two holes to slip through an elastic band and this band is sewn with the machine on both sides to the trousers waist. It seems like a good idea, but I do not like that you cannot adjust it at will. Since I've had my two children I have the tendency to gain and lose weight every few months *annoyed sigh*.

So I've decided to go for the second technique without the sewing-machine part! 

What you need:
A pair of scissors, needle and thread, two buttons, a safety-pin and elastic-band with button-holes
 How to:
Cut a hole inside the trousers waistband
Sew your two buttons a little further away from the hole
Button one end of the elastic, attach the safety pin to the other end, and push it through the hole
Tadaaaa! You're good to go after an under 10minutes job!
Now you have plenty of time left to grab a cup of tea and do something else while knowing that your trousers are adjusted and adjustable :)

I have a few more tutorials to come, I am so happy with crocheting that I have started making up patterns!

Thursday, 20 June 2013

Guest Post: B. from Ireland - T-shirt painting

Some people in our family like travelling and living abroad. One of my little sisters is currently having a fab time in Ireland while I really enjoy my life in Germany. It makes family gathering a little complicated but we manage :)
She has already shared with us on this blog several baking recipes, and here is now her latest creation (not in the kitchen this time!):

DIY (Do It Yourself)
You will need:
  • A tee-shirt (in my case, a white one, but if you want another colour, go for it!)
  • Some fabric paint
  • A brush
And eventually a plastic sheet and a cutter

Before anything, make sure that your table is protected and your clothes as well. The paint will stain your clothes forever and it is better to control the “stains” that you make ;).
A piece of advice: use some carton or a thick plastic bag to put inside the tee-shirt, to protect the side you are not painting.
If you know what you want, and you are talented enough to not having a model to paint your tee-shirt, I am jealous but that will be easier for you.
If, like me, you need a hour to be decide which pattern you’re going to paint, and you’re a bit clumsy, the plastic sheet will save your life.
Draw on the plastic sheet what you want on your tee-shirt, and on a wood board, cut gently with a cutter to create your own stencil! Tadaaaam!

Now, let’s go!
Make sure that your stencil is correctly adjusted on your tee-shirt; that is very important. You can use some cello tape, or some heavy small objects, be creative. The idea is that the paint should not go under the stencil.
Use the brush to paint inside the stencil, and let it dry. Depending on your paint you can take the stencil off straight away or not. I did, just after washing my brush.
I put the tee-shirt outside, on a Sunny Afternoon ♪.
Again, depending on your paint, to fix it, you may have to wash it! Use a 40° program maximum with your washing machine, and wash separately from light colours clothes (wash with jeans or on its own if you can).

Myself, I chose a white tee-shirt and a series of three black knots painted at the back of my top. I think that it’s discreet enough and elegant/cute.
I used the stencil for the line and the first knot and then I just used the shape of the knot that I had cut to make the stencil, and I painted around it to shape the knot and then took it away and fill with the paint. That was easier for me!

Needless to say that you can do it with anything and with any colours! Be creative and have fun!
I have few fabric bags that I want to customize, and this was first tee-shirt, but won’t be my last! 

Edit on the 24th of June: since the publication of the article, B. has sent me two pics of bags that she made.
 She used a real cut apple for the bag on the right. That's looks so nice that I might ask her to make some for me ;)

Saturday, 2 March 2013

Follow-up post - Oma's knitting

In this post I mentionned the two cardigans that my mother-in-law had knitted for little N. and I also said that one of the dolls also got a similar cardigan. I had not yet managed to take a picture, but now I have and here it is:

 How sweet is it?

Saturday, 11 August 2012

The work of a day

Finally I take the time to write a post, it is about time! Especially since I am going on holiday very soon and will not be able to post anything (apart from scheduled articles) for a whole month!
Several projects have been on for a month now. One that I cannot show you yet as the result is a present for two lovely girls who are turning two this summer. The other things I can talk about and post pictures :)

 A summer sleeping-bag
Days have been pretty hot for weeks now, nights too. Baby N. has been so warm and sweating so much that I finally decided to make her a very very light sleeping-bag. I had tried to make her sleep simply in her body, but just like her mother she needs something to cover her otherwise she sleeps badly. So, I simply copied out the shape of her sleeping-bag on an old bed sheet, drawing the contours with a piece of chalk that I have found in my Grandma's sewing-box. Cut out the three pieces, fixed them together, trimming in the inside with notching scissors (hoping it is the right word). I fixed bias tape around the arms and the neck and for the very first time in three years I MANAGED without making a mess on either side!!! I am SO PROUD of myself ^^. As you can see on the pictures though, I started the zipper far too low, which makes that she could get out of the sleeping-bag if she got the idea of doing it (I am not telling her!). When I have a little time available, I will probably fix some buttons or something to close the top part better.


A sleeping Mask
Now, this one wasn't done by me, I only participated in the finishing outside seam. My young cousin, J. (14 yo), visited us for almost a month and she got on helping me with some sewing projects and this mask is her very first attempt at the sewing-machine. I would say she did a pretty good job. Don't you think?
We got the pattern and explanations from this blog.
  
 Baby shoes
In this post, I have already shown home-made shoes. This time I needed bigger ones but I also wanted them to be stronger. I have recently ordered a lot of things from VBS, among which a bag of 500gr of leather remains. So I decided to attempt making leather shoes. At first I thought the sewing-machine would not be strong enough, but it did go fairly well. It just took me almost three times the expected time (which was two hours on the pattern). And to be perfectly honest, it wasn't quite just the work of one day since I finished the second one on the next day. I made a mistake on the second shoe and was too annoyed to finish straight away (was also far too tired and it was dinner time).
The yellow marks on the soles are antislips that you simply iron on your fabrics.


And finally after so much hard work, our hands and eyes were aching and my lovely husband prepared for us this delicious tomato, mozarella and basil salad. It was so refreshing and tasty! I dare say that we deserved it :)

Friday, 20 April 2012

Joint efforts = great results

Just before Easter I published a sneak-peek of what was coming up on this blog. Finally today is the day you will discover the whole project!
It was a joint project with my mother, G., my mother-in-law, H. and myself. It was a lot of work (more than expected) but worth it! My daughter looked splendid (as per usual I would say).

Baby N. was baptised a week after Easter. For the occasion she required a lovely dress as well as a white piece of clothing which she would receive during the ceremony. 

Patterns: we used a Burda pattern (9618) which is not available any more but we were lucky to find it on ebay! and for the shoes we used a very nice website "Petit Citron" which presents this pattern.

Material: Two shades of yellow cotton fabrics, one white cotton fabric, elastic band, elastic thread, white ribbon, press-studs, machine thread, a lot of patience and two sewing-machines (to work side by side).
 Pants
Those are pretty useless since, like most babies nowadays, Baby N. wears bodies, BUT I wanted to have them nevertheless because I find them very sweet! My mother-in-law made them. At first the pattern looked weird, but then it all became obvious and they were pretty simple to sew, the "hardest" pieces being the ruffles.
  Shoes
I chose to make them of the colour I used for the pants, a stronger yellow. They were very easy and quick to make (less than two hours), the only thing I would make different is the size of the elastic-band, it isn't tight enough. Those shoes are so easy to make that I plan on making different pairs soon, including some with leather (or fake leather) for when Baby N. will start crawling. 
  Yellow dress
 Also made by my mother-in-law. The pattern was giving the long sleeves for the long dress and the short ones for the small dress but we did the contrary, which made that she got the hassle of fitting the sleeves. It wasn't so bad. One thing we discovered while making the dresses is how to make machine smock. Easy as peas!

One "just" needs to hold a stretched elastic thread along a lign and zig-zag stitch on top of it. For the following ligns, one should stretch the fabric as well as the thread. Finally after releasing the fabric and thread it all comes together!
White dress
The length of this dress is maybe a tad too long, but I like it so. It does look a bit like the old traditional baptism dresses, but without all the different layers and the lace, it is simpler.
My little helper ♥

 Jacket
We are in April but the weather is very changing and last week was quite cold. To prevent Baby N. from getting cold on the way to church and back home, my mother made this lovely fleece jacket. One of the great things about it is that it is perfectly reversible! Buttons and embroidery on both sides and we get a jacket which fits more than just one occasion!
 Baby N. is quite spoiled, don't you think? The three of us, mother and grand-mothers, made those things with a lot of love and the little one looked quite gorgeous! ♥

I only wish the three of us had been able to work all together in one room for a whole week, but being in two different countries does not really help ;) .
Merci beaucoup Maman! Vielen Dank H.!