My visitors

Wednesday, 31 July 2013

Cooking&Baking Challenge - Session 3 : participants ?

I am definitely liking this Challenge very much! I am just dreaming now of more participants ;)

Who is in for the next session? We will want to see the recipes on the 31st of August and as usual, I can host the recipes of those who do not own a blog. You just need to email me (here) the recipe, your name and some pictures! 

To your kitchen now!

* Myself as per usual

* Ben


* Steph 

* Isabel

Cooking&Baking Challenge - Session 2 - The recipes!

Good morning everybody!

Today is marks the end of our second session for the Cooking&Baking Challenge!

We had four participants, follow the links to the recipes:

Cooking&Baking Challenge - Session 2 - Penne with potatoes and spinach

Penne with potatoes and spinach
(probably for four persons)
* Ingredients:

3 tomatoes
200 gr potatoes
4 spring onions
1 celery (we didn't use it)
300 gr fresh spinach or 200 gr frozen
A large handful of basil
3 tbsp olive oil
3 tbsp butter
2 garlic cloves
200 gr penne pasta
salt, pepper
600 to 800 ml vegetable stock
100 gr parmesan cheese

* Wash the tomatoes and cut them in cubes. Wash, peel and slice the potatoes. Cut the spring onion in small slices. Wash carefully the spinach and cut it broadly. Leave it to drain in a sieve. Wash and cut the basil.

* Heat up the olive oil and butter, add the spring and potatoes slices. Cook them a bit. Add to it the tomatoes, the garlic and the raw pasta. Season with salt and pepper to taste. Slowly add the vegetable stock, leaving it to reduce until the pasta is done (it takes about 15min). Shortly before the end, add the spinach, basil and the grated parmesan. Season again to taste with salt and pepper.
It was a really lovely dish although a little too liquid and missing some spices. But never the less little N. liked it as much as we did.

Recipe from "Unser Kochbuch - Alternativen zu Fish und Fleisch" Alfred Biolek & Eckart Witzigmann.

Cooking&Baking Challenge - Session 2 - Steph

Because Steph's blog is now set on private setting, I am hosting her article for everybody to see and enjoy. English translation coming soon!
 
PANNA COTTA AUX FRUITS ROUGES

Pour ma première (et pas la dernière j’espère !!) participation au challenge proposé par ma copinaute Fred, j’ai décidé de partager ma recette de panna cotta aux fruits rouges. Toute la famille l’adore et la réclame à grands cris très fréquemment ! Par ailleurs, comme je suis en vacances et que j’ai très beaucoup la flemme, je me suis choisi une recette rapide et trop facile !! Avez-vous remarqué comment, quand on travaille, on n’a pas le temps et quand on est en vacances, on n’a pas envie !!! Un comble !!!

Allez, c’est parti ! Liste des ingrédients en images :


un litre de crème fraîche entière (donc 30% de matières grasses)


 150g de sucre en poudre


 une gousse de vanille (la mienne provient tout droit de Madagascar, merci Blandine !!)

4 grammes d’agar-agar
Il peut s’avérer compliqué de peser 4 grammes d’agar-agar car cela fait bien peu. Pour ma part, j’utilise la balance de précision qui me sert pour mes préparations cosmétiques. Pour ceux qui n’auraient pas un tel instrument, 4 grammes d’agar-agar correspondent à une cuillère à café pas trop bombée, mais pas rase non plus ! voir photo…


Et pour terminer, du coulis de fruits rouges (le mien était surgelé, acheté dans le commerce, vu que mes mûres ne sont pas encore mûres ; d’habitude je prends le coulis réalisé avec les mûres de mon jardin…).


Pour commencer, verser le litre de crème dans une casserole et ajouter le sucre.

On verse en pluie les 4 grammes d'agar-agar dans la crème.
Pour ceux qui ne connaîtraient pas, l’agar-agar est une algue qui a des propriétés gélifiantes certaines et qui peut avantageusement remplacer la gélatine. Elle n’acquiert ses propriétés qu’après ébullition et gélifie en refroidissant.
Occupons-nous maintenant de la gousse de vanille : il faut la fendre en 2 et gratter toutes les graines avec la pointe d’un couteau, puis ajouter les graines ainsi que la gousse dans la crème.


A l’aide d’un fouet, on remue bien pour bien dissoudre le sucre et l’agar-agar et pour bien disperser les grains de vanille uniformément dans toute la préparation.

Il n’y a plus qu’à porter à ébullition et à maintenir l’ébullition au moins 2 minutes.

Ensuite, on sort du feu et on laisse refroidir une bonne vingtaine de minutes en remuant de temps en temps pour éviter qu’une « peau » ne se forme à la surface de la préparation, l’empêchant ainsi de refroidir rapidement…
Attention! si l'on oublie la panna cotta, elle va gélifier au fond de la casserole!! Mais si cela arrive, il suffit de refaire fondre le tout à feu doux et de la transvaser dans les ramequins AVANT sa gélification!
Il ne reste qu’à verser la préparation en ramequins et à mettre au frais au minimum 2 heures.


Au moment de servir, verser le coulis de fruits rouges sur chaque ramequin et décorer comme bon vous semble, ou avec ce que vous avez dans vos placards…
Pour moi, c’était feuilles de menthe du jardin et spéculoos !


Buon appetito a tutti ! car j’ai oublié de vous dire que cette recette est italienne
et que son nom signifie « crème cuite » !
J'ai beaucoup employé les termes "gélifier" ou "gélification" au cours de cette recette, mais ne vous attendez pas à quelque chose qui ressemblerait à du Flanby! Au contraire, c'est une recette très onctueuse, du fait des matières grasses de la crème. Les termes "gélifier" ou "gélifiant" sont les termes techniques utilisés pour exprimer les propriétés de l'agar-agar, mais ne rendent absolument pas compte de la texture de cette recette!
Essayez et vous m'en direz des nouvelles!
Sachez que pour varier les plaisirs, on peut recouvrir la panna cotta d'une sauce au caramel beurre salé ou au chocolat par exemple!

Cooking&Baking Challenge - Session 2 - Isabel

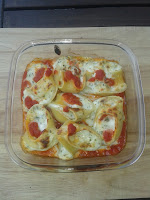
Cheese-stuffed pasta shells
 
Ever since I saw them in the United States (even though they were huge there), I’ve always wanted to try cheese-stuffed pasta shells.
To make the recipe, I’ve used several web pages (mainly http://www.food.com), plus whatever I really needed to use in my fridge.
Here’s how it goes.

Serves about 2.

Ingredients:
· For the shells.
-          8-12 (depends on the size) pasta shells. In these cases, it’s better to cook one or two more, just in case they break while cooking.
· For the filling.
-          1 egg, slightly beaten.
-          150 g Ricotta cheese.
-          70 g fresh Mozzarella, shredded.
-          35 g Parmesan cheese.
-          ½ tsp dried parsley.
-          ½ tsp dried oregano.
-          ½ tsp salt (depends also on the types and brands of cheese you use).
-          ¼ tsp black pepper.
· For the sauce.
-          1 medium onion, cut in brunoise.
-          2 garlic cloves.
-          400 g crushed tomatoes (1 small can).
-          ½ tsp salt
-          ¼ tsp black pepper.
-          2 tsp sugar (white).

Instructions
1.       Cook pasta following the instructions, though I usually prefer al dente (much more, considering that it will be a bit baked later in the oven). Rinse (I usually add a bit of olive oil to my pasta, so that it doesn’t stick) and reserve.
2.       In a bowl, mix the Ricotta, Mozzarella, Parmesan, herbs, salt and pepper. Blend everything well and stuff the shells with them.
3.       For the sauce, sauté in olive oil 1 medium onion cut in brunoise and 2 garlic cloves, crushed. Add the crushed tomatoes, salt, pepper and sugar. Simmer for about 10-15 minutes.
4.       In an oven-proof, serving dish, coat the bottom with most of the tomato shells. Place the stuffed pasta and top with a bit of the sauce. You may also add a bit of Parmesan and bread crumbs.
5.       Cook in preheated (220ºC) oven until the cheese on top melts and is golden.

Monday, 29 July 2013

Loop scarf

 I bought some nice jersey fabric some time ago... It was on sale... and it took me a while to decide what to do with it!
One seam and done! A loop scarf (also called infinty scarf), which can be used as a scarf, a headband+scarf, and also as a breastfeeding cover.

Easy and quick. Everybody can do it!

Baby Shoes... again!

Does anybody remember on what occasion I made special baby shoes for my daughter? Those are now for my son, for a similar occasion! I cannot wait to be able to show you the rest of the outfit :)

My first home-made trousers!

My baby boy is almost 7 months old and I don't seem to be able to shake off the few extra kilos that I have left from my pregnancy. It will probably come in due time, I just need to be patient I suppose. On the other hand, I have been wearing pregnancy trousers since January 2011 and they are now unbearable! Loose, with holes and I simply hate the idea of those trousers now! 
BUT! I don't seem to be able to fit in my old trousers at all and in shops I cannot find the right size at all. When they fit on the legs they are too small on the hips, and when they are right on the hips they are waaaaaay to large on the legs. 

My solution: buy fabrics and make my own trousers! The result isn't particularly stylish but hidden by my t-shirts it looks fine... I think. At least they are comfy and I paid less than 20€ everything included.

I made my pattern by undoing my old trousers to get the legs shape and then I fiddled around for the upper part. No time and no brain to think on how to included pockets, so there is none. In Autumn I will need a second pair. Maybe I will give it more thoughts then.

In the meantime I can throw away at least one pair of pregnancy trousers (throw out of my wardrobe but keeping them for fabric recycling obviously!)


Wednesday, 24 July 2013

Experimenting with the senses and developping fine motor-skills

A toddler, a box, needles and a needle cushion or ice cubes and a curious toddler... that's the recipe for some time of quietness for yourself, and discovery for your child! Little N. found the whole thing really interesting: that the ice-cubes eventually melted for instance, that she was allowed to put them in her mouth and found them very very cold and unchewable. For the needles, she had been trying to steal mine for some time, so I eventually pick 5 with colours and gave them to her (under careful supervision OF COURSE! and I do take them away once she is done playing!). She discovered that I was not joking when I told her needles sting ;)


 What about you? What do you do with your children?

Headband and skirts

Quick projects here and there... I somehow find it difficult to concentrate on the big ones for very long and always end up making small stuff on the side. Anybody else is like this?

My mother-in-law did recycle some of her trouser and when I took a piece of the left-overs and put it on little N.'s head just for fun, I realised it was the right size! Some scraps of blue fabric and tadaaaaaaaam: 
 
A headband!

Then I made something for myself, long needed! Baby T. is over 6 month old now and I really cannot wear my pregnancy trousers anymore. First because the weather is so hot, and second because they are so old! One does actually have a big hole which renders it completely useless. So I grabbed some old fabric, wanting to make a convertible skirt/dress, but it ended up as a skirt. It was too long and looking weird so I chose to cut of the bottom... and as a final result I got one skirt for myself and two for my daughter!

 And finally I made this little skirt for my darling to wear next month at her brother's baptism. Unfortunately I will not have time to make a shirt to go with it, but nevermind, at least she has this in my favourite colour ;)

It is incredible how much one can get done when 1) both children have reasonable napping times and 2) when one's husband has a whole month of holiday at home!! ^^ I would not manage to make so much without him!! ♥

Tuesday, 23 July 2013

Reminder!

Hi everybody! 

Just a quick reminder that the second session of the Cooking&Baking Challenge is soon coming to an end.

So far I have three participants plus myself. It still isn't too late to participate!


Tuesday, 9 July 2013

Travelling toys - N's birthday presents again!

As I have mentionned before, I have been working hard on making little N.'s birthday presents. I am now pleased to say that I am completely done (just working on my niece's present now) and I just need to wrap everything :)

The two themes for her presents are: * felt food and * travelling

Here is what I made to keep her busy when we will be waiting at the airport in August:

* A pencils and note-book case (here is where I got the inspiration from)


 * And a mouse in a tin-box with her teddy bear (here is the link)

 
 They are not as good looking as on the website I found, but I like them well enough. I must confess that I made them very quickly one morning before my children woke up, i.e. half an hour or so!

I find it very hard to wait until next month to give N. all of her presents! I will show you the last thing only after her birthday so as to not spoil the surprise for her little friend' mother - he is getting the same thing as her... ;)

Sunday, 7 July 2013

Cooking&Baking Challenge - Session 2

I haven't had anybody telling me if they would participate to the 2nd session yet... If you would like to cook or bake and then share with us pictures, recipes and tips this is for you!

Please let me know :) - I do remind you that you do not need to own a blog, I can host your aticles without any problem!

 The recipes will have to be shared on July the 31st.


List of participants:

* Myself ;)

* Ben

* Isabel 

* Steph